Wednesday 14 October 2015

Anything but Mustard

Amidst the varied delights of 'The Nana Stash', there is one particularly eye-catching feature. It's a bag containing four large spools of combed cotton, in a thoroughly appealing yellowish brown colour. It's an item I have come to think of as "The Mustard". When Mum handed it over to me, she said with a smirk, "I can't wait to see what you do with this".


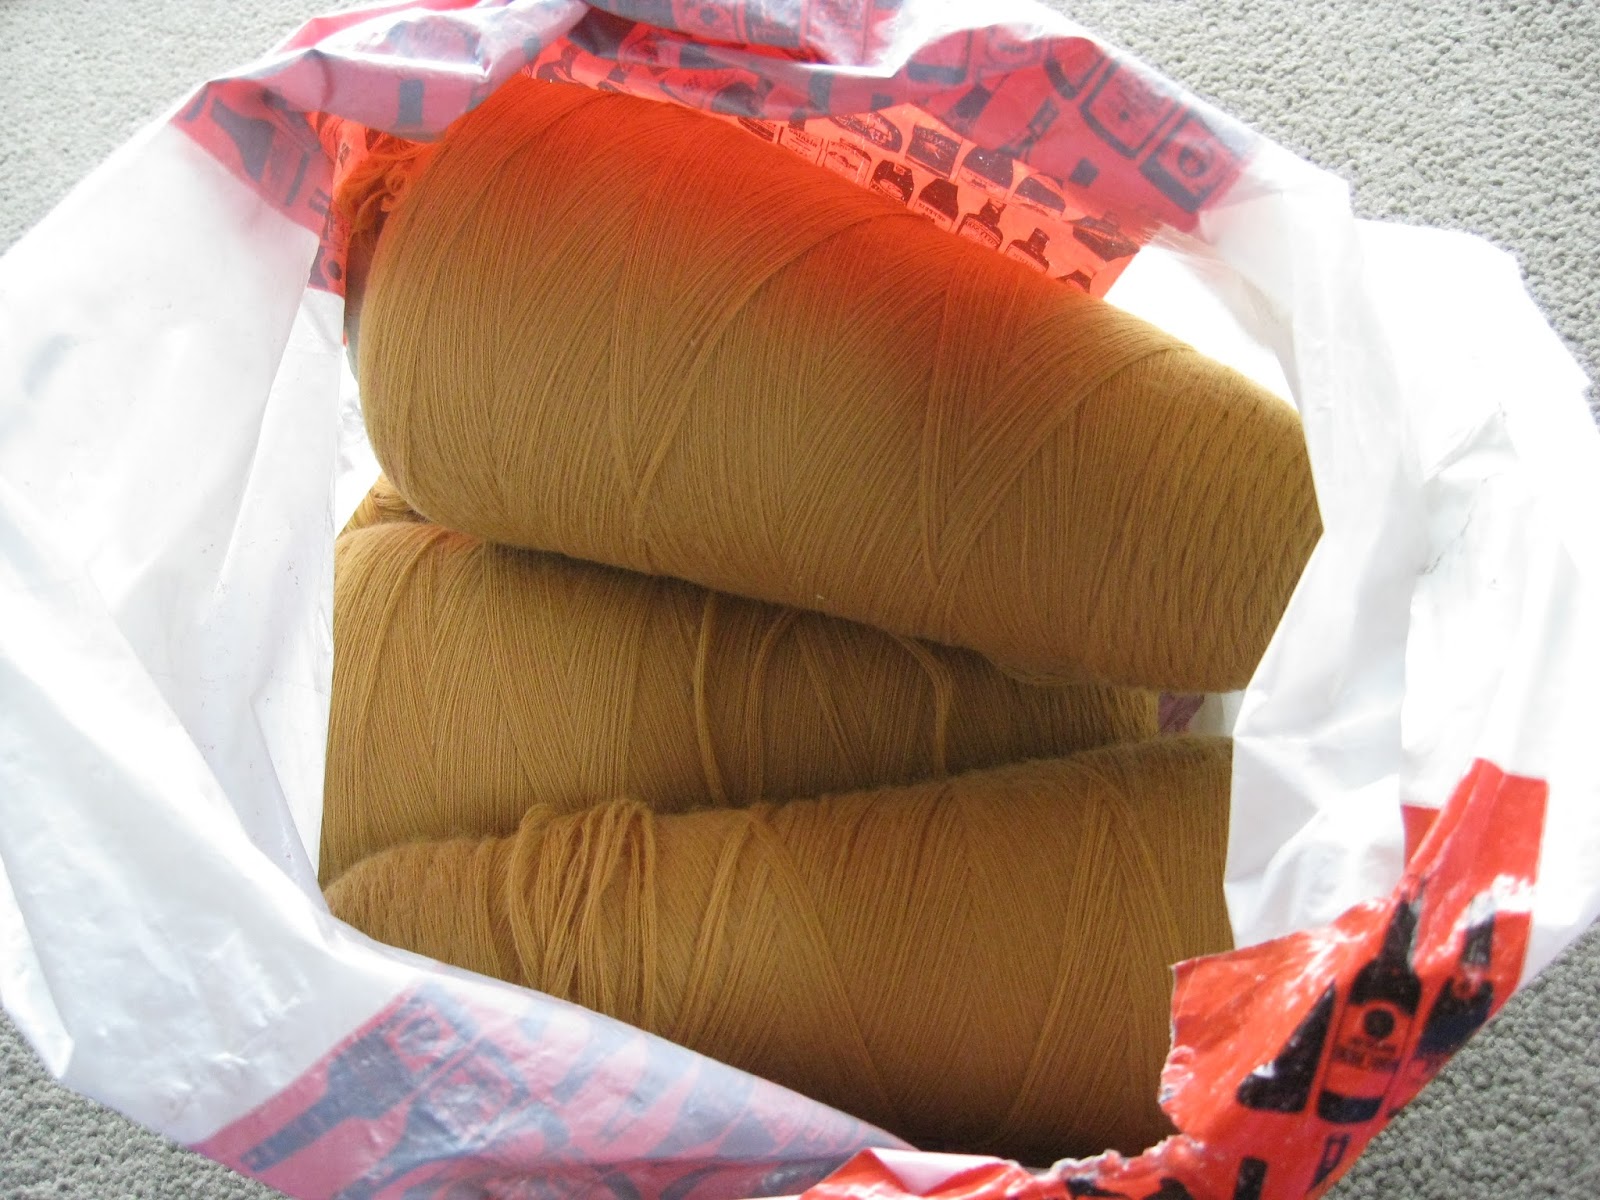
I'm sure there are people out there who are partial to this colour, and can even look good wearing garments made in it. I am not one of those people. So you can imagine how delighted I was to find the label confirming  that The Mustard was definitely cotton. Why? Because - at least theoretically - cotton will take a dye.


Clinging to the possibilities offered by a dye packet, I decided to bite the bullet and use some of The Mustard to make myself a top. If the dye was successful, then the remaining spools would become a useful resource for future projects. If not.. well, I'd cross that bridge when I came to it.


After a bit of browsing, I decided to go for this tank top pattern, which seemed fairly straightforward. I didn't want to spend too long making something that might end up a blotchy dye disaster. In fact, it's a ridiculously easy pattern, as far as tops go. If you can do a double crochet, you can make this.


Mustard was surprisingly nice to work with. The combed strands were not nearly as inclined to tangling or loose threads as I expected, and it's pleasantly soft to the touch.


On my next visit to Lincraft, I stood musing in front of the dye stand for some time. I'd never dyed anything before, so I didn't really know what to look for. I selected a mid blue and checked out the instructions.


For "strong colours", the use of a pre-wash to remove the current colour was recommended. Otherwise, "colour-mixing rules apply e.g. red+blue=purple". I wondered if mustardy yellowish brown counted as a 'strong colour', but since they didn't seem to have any of the pre-dye on sale, that wasn't an option anyway. So going by "colour-mixing rules", what do you get when you mix blue with mustard? Hmm. I experimented with a couple of conveniently similar-coloured felt pens when I got home, and came up with a sort of bluish green. I reckoned I could live with that.


Of course, that's not what happened at all.


I took the dye sachet home, made up the dye bath as per the instructions, and placed the mustard top in the liquid. It didn't take long before I knew that neither the blue nor a bluish green were a likely result. The Mustard was still showing strongly through a dingy greyish tint, which didn't get any darker as time went on.


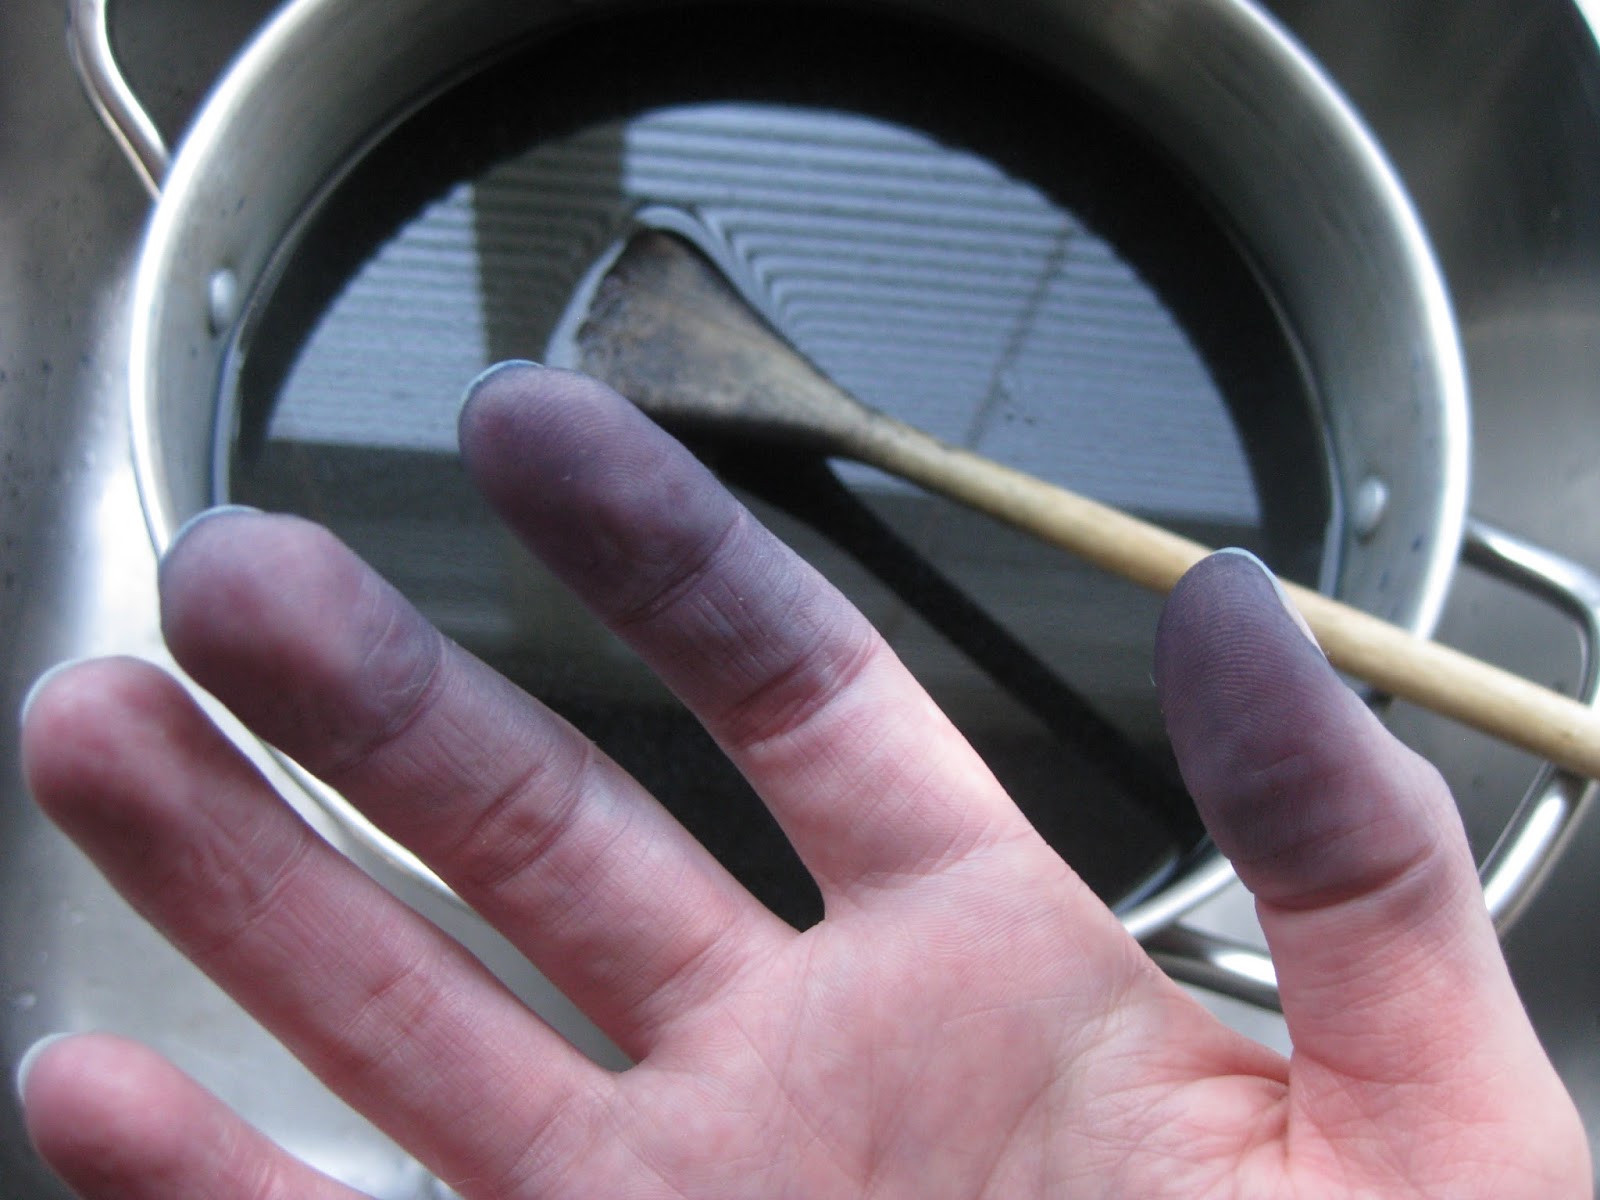
Further surprises were to come, however. When the dyeing time was up, I took the top out to rinse it. Every bit of the dye came out in the rinse: my tank top was exactly the same colour as it was before. My fingers, in contrast, had successfully taken on the expected shade of blue. (The instructions did say to wear gloves, a point that I briefly noted and then forgot about. I am not likely to forget that again).


While my delightful mustard tank top dried on a rack nearby, I sat and pondered my next move in battling that which I had now mentally dubbed "The Undyeing Mustard". The best plan seemed to be to get my hands on some of the recommended pre-dye. If I could leech the original dye out of the fibres, they might be more amenable to taking on a new colour.


A trip to Spotlight supplied me with the pre-dye, which removes the colour by means of boiling. After the first few minutes on the boil, I could see that it was working: The Mustard was getting lighter. The final result was a sort of sad beige - a much better canvas for taking dye than the original colour. I had to ensure all of the pre-dye had washed out before sticking it into a new dye. Since the top had already come through one washing machine cycle unscathed, I figured the easiest way to get it clean was to put it through the machine again.


I can't be sure whether it was the long boiling and stirring, or the agitation and spinning of the washing machine, but what I finally retrieved from the machine was a matted, stretched, misshapen version of my original top. This was disappointing, but I had to hope I could block it into usable shape after the final dye. In any case, I wasn't about to give up - I had to know whether the dye would work this time!


The new dye was a different brand, which offered various dye methods to choose from. Since the pre-dye had worked so well, I decided to use the boiling method for the dyeing as well. I'd chosen black this time - the darkest colour possible, in the hope that I could at least get a grey out of it.


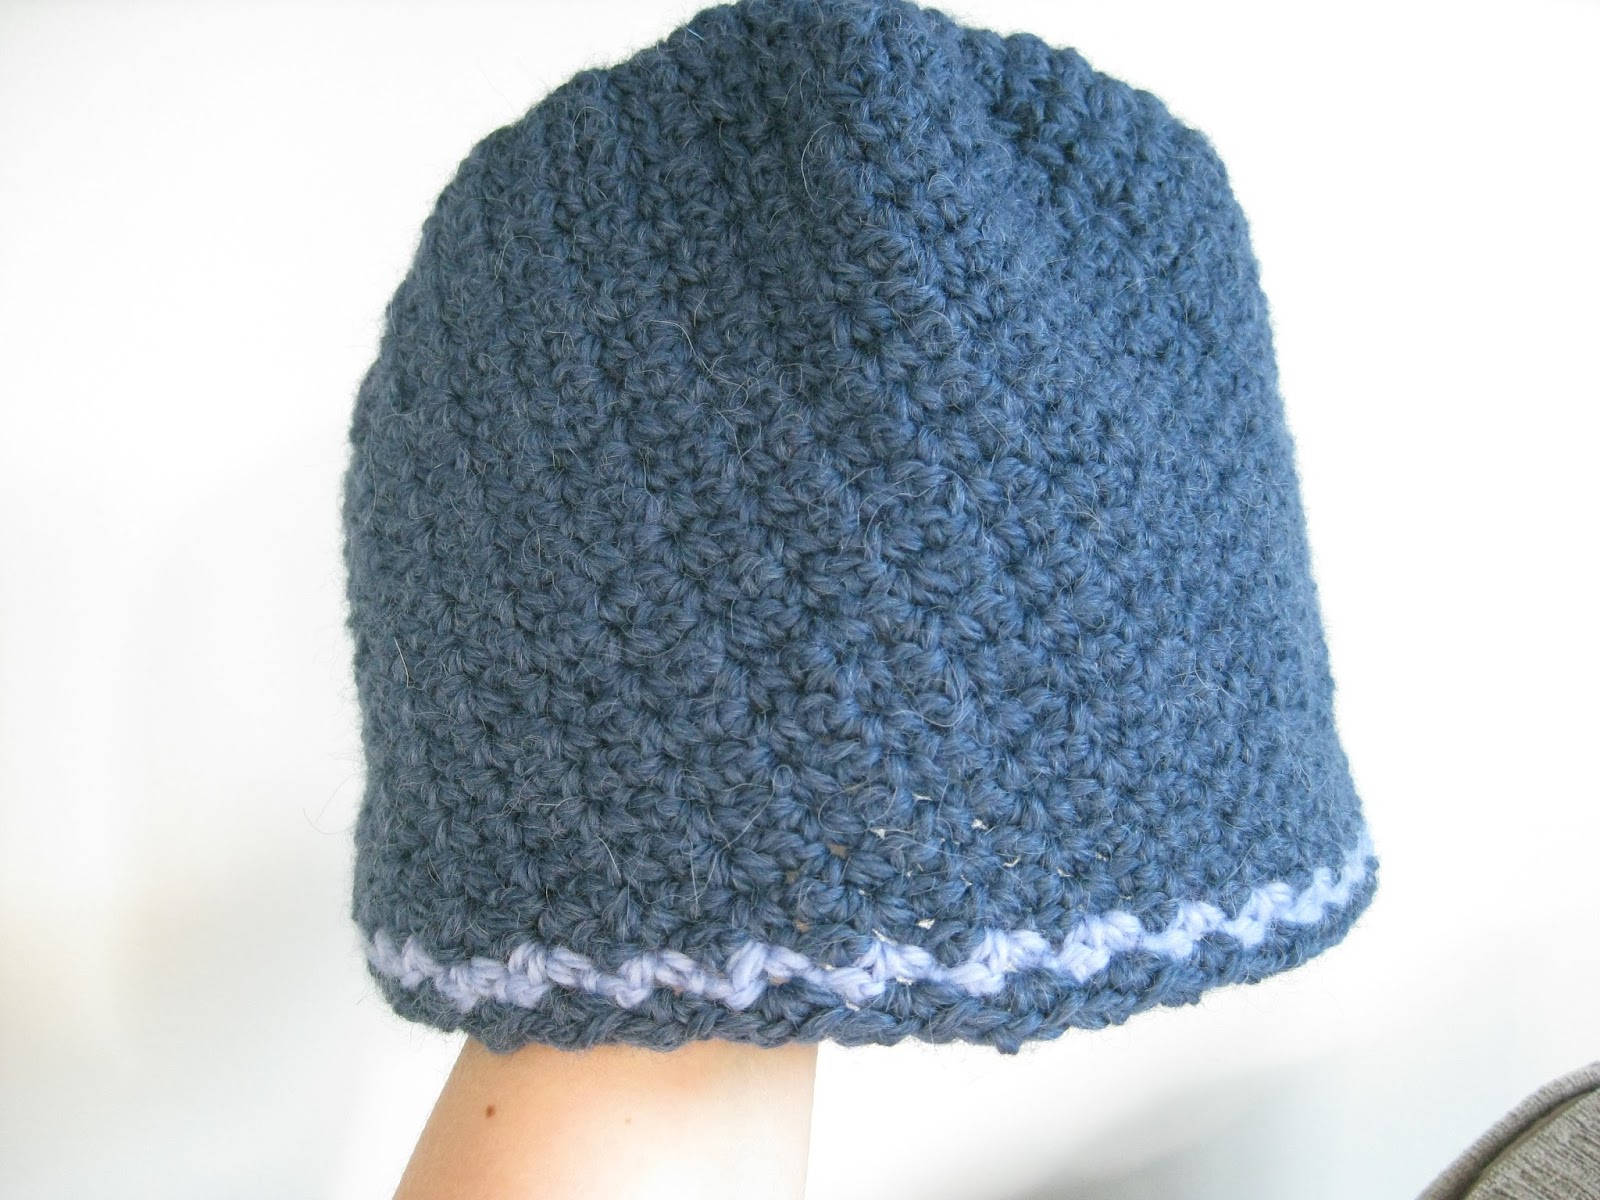
It worked, albeit in a slightly unexpected fashion. While the top was in the pot, it was sporting a quite appealing steel grey shade. I was perfectly happy with that. When it came to the rinse, the colour started washing out again. Not all of it this time though - the colour I got from a black dye turned out to be a lightish blue.


Unfortunately, further boiling, stirring, rinsing and squeezing had not helped the matted misshapenness of the garment. The neckline was stretched well out of shape and the hem had an unevenly frilled effect. In places, the shell stitches were matted together while elsewhere the stitches had gaped widely. I did my best to manipulate the top back into shape, pinned it in place and crossed my fingers as it dried. This affected some small improvement, but sadly not enough to make for a wearable garment. It was just too stretched and shapeless.


Refusing to admit defeat, I patiently unpicked the whole top, soaked and hung the resulting skeins in an unsuccessful attempt to remove the crinklyness, then wound it all up into balls and started again.


The No-Longer-Mustard, used and abused by means of boiling, dyeing, stitching, and frogging, was not nearly as nice to work with as before. Stripping the dye from the yarn had also stripped it of its silkiness. The strands would not run smoothly through my fingers. It took much longer to make the top a second time.


The result is not exactly my best work - it's a bit untidy, and shorter than it should be. The gauge came out a bit different with the dyed yarn, and didn't stretch as much in blocking. I had enough left over to tidy up the hem with a thin band of sc edged in crab stitch, which added a little length, but it's still shorter than I'd like.


Still, I'm happy. Who would have thought I'd get something wearable out of that mustard?


Saturday 19 September 2015

Needle arrangement

When I recently acquired the large collection of yarn belonging to my Nana, I also became the proud owner of many, many a knitting needle. There was a bag full of needles which, once carefully sorted, came to 60-odd pairs, plus an assortment of double-ended needles, circular needles, Tunisian hooks,  and various pins and counters.


I don't even knit.


The paired needles have been set aside for that hypothetical day on which I suddenly overcome my aversion to knitting, but I still had a large number of mismatched and broken ones. It didn't seem right to throw them out without investigating possible uses, so I went to my good friend Google and asked for ideas on repurposing knitting needles.


There were surprisingly few results. Most of the suggestions that came up were for bending them into bracelets. I had no use for a knitting needle bracelet, but the knowledge that plastic knitting needles can be softened and shaped gave me ideas of my own.


Why not use knitting needles as stems for crochet flowers? It would look silly if all the 'stems' were dead straight, but the ability to bend those stems a bit would allow much more scope for arranging. (I guess it would be more appropriate to make knitted flowers, but crochet is my natural default).


I sorted through the  pile of mismatches to see what I had to work with, and played around doodling arrangement designs until I came up with something I liked. Given that I have no expertise whatsoever in either drawing or flower arranging, this took a while. Once I had a 'design' I thought I could replicate, I dug out a few odds and ends of yarn for use on flowers and leaves.


For the main flower I followed this lovely rose pattern, though I used a medium weight wool and a 4mm hook, seeing that I wanted quite a large flower. Actually I miscounted my stitches somewhere along the line, so I ended up with a couple more petals than I was supposed to have. It looked alright though, so I left it the way it was and moved on to the other flowers.


The idea was for the higher-up flowers to look a bit lilyish. I couldn't find a lily pattern I liked, so I experimented a bit and generally made them up as I went along. The basic concept was to make a cone with 5 chains spaced evenly around the rim, then form the petals around the chains. After a certain amount of experimentation and a couple of do-overs, I had some flowers that roughly corresponded to my mental design. The pattern can be found below.


The leaves are all different sizes, but were made in much the same way as the flower petals, i.e. a combination of stitches increasing then decreasing along each side of a central spine, attached to a base ring that grips onto the needle stem. I've included a basic pattern below - this is for a leaf the same shape as the flower petals, but you can change the size and shape very easily, by lengthening the chain or experimenting with the combination of stitches used to shape the leaf.


The next step was to bend some of the knitting needles into 'stems'. I approached this part with some trepidation - if I didn't manage to shape the needles the way I wanted, I might have had to scrap the whole project - but it turned out to be very easy. The plastic softens in boiling water almost immediately; all you have to do is fish the needle out with a pair of tongs, bend it into shape and hold it for a short time until it cools.


Most of the needles I used were red, green or brown, in keeping with the overall colour scheme, but I decided to include one typical grey needle, just to emphasise the knitting needle theme of the arrangement. I made a little twist in this one by winding it around the handle of a wooden spoon.


The final step was to fill a vase with floral foam and arrange my flowers. It didn't turn out quite the same as my 'design', but I was happy with it.


So, in short, I get given a bunch of knitting needles, and my immediate reaction is to make something out of the ones that can't be used for knitting. I suppose the next thing is to employ some of the usable ones for the traditional purpose, and actually knit something. That'll be interesting.


Crochet flower with knitting needle stem


Yarn: whatever you like.
Hook: a suitable size to make reasonably snug stitches in the yarn you're using.
Stitch marker
Old knitting needle for flower stem

Ch5, sl st to make a ring.
The base cone is stitched in continuous rounds, adding 2 stitches per round until you have a cone that is 15 stitches around. Use a stitch marker to keep track of rounds.
Round 1: 5sc in ring (5st)
Round 2: 2sc in first st, 1sc in next 2 st. 2 sc in next st, 1 sc in next st (7st)
Round 3: 2sc in first st, 1sc in next 3 st. 2 sc in next st, 1 sc in next 2 st (9st)
Round 4: 2sc in first st, 1sc in next 4 st. 2 sc in next st, 1 sc in next 3 st (11st)
Round 5: 2sc in first st, 1sc in next 5 st. 2 sc in next st, 1 sc in next 4 st (13st)
Round 6: 2sc in first st, 1sc in next 6 st. 2 sc in next st, 1 sc in next 5 st (15st)
Round 7:*Ch8, then 8 sc down the spine of the chain. sc in the next 3 stitches. Repeat from * five times.


 When you have a cone with 5 chains attached, fasten off and weave in ends. (If you don't want a two-tone flower, just keep going with the same colour)

With new colour, sl st between chains
*Make the following stitches up the 8 stitches of the chain:
hdc; dc x 3; hdc x 2; sc; sl st. ch3.
Reverse the order of the stitches down the other side of the chain:
sl st; sc; hdc x 2; dc x 3; hdc.
sc 3 st together between petals
Repeat from * 5 times. Fasten off and weave in ends.
Thread knitting needle through cone for 'stem'.

You can change the look of the flower with longer chains or different combinations of stitches to shape the petals.


Leaf to grip onto knitting needle stem

Ch5, sl st to make a ring.
5 sc in ring
sc in each sc around
Ch8, then 8 sc down the spine of the chain. sc in base ring.
Turn, and make the following stitches up the 8 stitches of the chain:
hdc; dc x 3; hdc x 2; sc; sl st. ch3.
Reverse the order of the stitches down the other side of the chain:
sl st; sc; hdc x 2; dc x 3; hdc. sc in base ring.
Fasten off and weave in ends.


Sunday 6 September 2015

Mitten's Mittens

My sweet little niece, of an age to be parroting words when I last saw her at Christmas, had some difficulty pronouncing my name. Attempts at "Robyn" came out adorably as "Mitten". I'm sure she'd be able to say my name now, but I have to admit to encouraging "Auntie Mitten" as a nickname. It's just way cuter than "Auntie Robyn"!


When digging through my stash, I found I had two half-skeins of 8-ply merino wool, the familiar leftover amount that is seldom enough for a project in itself - but, as it turns out, sufficient if you happen to have two that can be used together.


The two half-skeins were different brands and different colours, but similar enough in weight and texture to work in a single project. And what else would Auntie Mitten make, but mittens? I immediately pictured fingerless mittens in a shell-stitch - simple enough that I could come up with a pattern myself, with a little trial and error.


It wasn't difficult to make a basic tube shape with a hole for a thumb. My biggest concern was whether I had enough yarn to complete both mittens. To ensure I didn't run out, I located both ends of each skein of yarn, and worked on both mittens at once, alternating from one to the other, making a few rows at a time. It takes a bit of manoeuvering to keep the four separate strands from tangling, but it means you can judge how much yarn is left and how many rows you can afford to make over the wrist and fingers.


The resulting mittens are really quite cute. Mum immediately put her hand up for a pair, so I made her some using leftover yarn from a baby blanket made some time ago. The baby yarn was finer than the merino, so I added an extra shell to each row, and used a smaller hook so the stitches weren't too open.


Below are the instructions for these very simple mittens. This is my first attempt at writing a pattern, so I hope I've made it clear enough. I've used US crochet terminology (UK terminology is actually more traditional in New Zealand, but I learnt to crochet online).


You can adjust the length by adding or subtracting rows, and/or widen them by adding shells - just keep to multiples of six in your foundation chain and the shells will work out fine.


Mitten's mittens


5.5 hook
8ply merino in two contrasting colours
Stitch markers (I use safety pins)

Ch = chain
St = stitch
Sk = skip
Sl st = slip stitch
Sc = single crochet
Dc = double crochet
Shell = 5 dc in same stitch

Note: Ch3 counts as dc throughout. In places you will be stitching past the stitch-marked loop on the round below. Keep the stitch-marked loop to the front of your work and continue as for any other stitch.

Base ring: ch 24 with colour 1. Turn chain over and sc in spine of each ch. Join with sl st to make a ring.

Row 1: (sk 2 st, shell, sk 2 st, sc) 4 times. 3 sl st to top of shell. Do not fasten off; place safety pin or stitch marker in loop.

Row 2: with colour 2, sl st into last sc in previous row. Ch3, 2dc in same st. Sk 2 st, sc in centre dc of shell. (Sk 2 st, shell, sk 2 st, sc) 3 times. Sk 2st, 2dc in same sc as beginning of round. Sl into top of ch3. Do not fasten off; place stitch marker in loop.

Row 3: remove marker from loop 2 rounds below and insert hook in loop. Sl st into sc immediately
above. Ch3, 2dc in same st. Sk 2 st, sc in centre dc of shell. (Sk 2 st, shell, sk 2 st, sc) 3 times. Sk 2st, 2dc in same sc as beginning of round. Sl st into top of ch3. Do not fasten off; place stitch marker in loop.

Row 4-11: repeat row 3.

Row 12: (create thumb hole): as for previous rounds, but replace sc between 1st and 2nd full shells with a ch1.

Row 13: as for round 3. When you reach the thumb hole, stitch into the ch1 as for sc in other rows.

Row 14-17: as for round 3.

Instructions for second mitten are identical except for row 12. In row 12, ch1 for thumb hole between 3rd and 4th (4th= shell with join) shells rather than between 1st and 2nd. This will mean both mittens have the chain-seams on the palm.


Sunday 30 August 2015

Unfinished Bazness

A few months back, I decided to make a hat for my Dad (who, by way of explanation, is known to the family as 'Baz'). After perusing the Lincraft shelves for some time, I selected a nice soft wool-alpaca blend in a shade of blue I thought he'd like.


On inspection, I found that the yarn was actually 12-ply, something I'd overlooked when getting sidetracked by colour selection. It was a thicker than I wanted for this neat little pattern, but I wasn't too worried.


"Oh, gauge won't much matter for a hat," I thought. "I'll just use a bigger hook". This piece of erroneous logic resulted in a beanie suitable only for an individual with a head the size of a bucket. It was useless; I pulled it undone and chucked the yarn back into the stash.


A few weeks ago, on hearing that my parents were planning a day-trip to Christchurch, I remembered I never made that hat, and decided to have another go at it. I dug through the stash and pulled the yarn out again. I couldn't find another pattern I liked better than the first one, so I figured I'd just go down a hook size. Two, in fact, since the first hat was so oversized.


Using a thicker yarn with a smaller hook made the working fairly dense. The pattern itself can be a bit tricky if you're not paying attention - it's a design of v-stitches, but you have to be fairly careful to stitch only inside the v-stitches, and not in the gaps between. Even then, the shaping of the crown comes together in an an unusual five-pointed shape, and takes a while to form a recognisable hat shape.


A small amount of a lighter blue sourced from the Nana stash provided a contrasting stripe, and the beanie was complete. It was actually a bit small, this time. Ironically, if I hadn't got concerned about the weight of the yarn and just followed the pattern, it would probably have come out fine. Oh, well, crochet tends to stretch a bit anyway.


As it turned out, the beanie didn't really suit Baz at all. It sat oddly and tended to ride up and sit above his ears. Mum says he has a funny-shaped head and his hats always do this, but I think it would be less inclined to do so if it were a better  well - I tried!


Monday 24 August 2015

Doily decor

I like to have a chair in a bedroom. Somehow, a room seems more properly furnished with a chair in the corner. And of course, it's useful for throwing things on.


For this reason, I had been on the lookout for a suitable chair for my spare room. It's not a large room, so a normal occasional chair wouldn't fit. I needed something smaller.


Yes, I am going somewhere yarn-related with this. Be patient.


In the end I spent $10 on a second-hand dining chair at the Eco Shop. Stained, battered and dated, (in my brother's words: "looks like it's been stolen from a motel") it was in need of a bit of attention. I originally intended to recover the seat with new fabric, but couldn't find any to fit the colour scheme of the room.


Which is where the yarn stash comes in. Amongst the Nana-stash were a couple of balls of 3-ply in a shade of purple that would work well enough. The idea I had was to create a doily-style cover for the chair seat, backed with a plain colour fabric.


After a bit of browsing, I selected one of these three patterns. In fact, I inadvertently chose the smallest of the three, (the yellow one) which was a bit contrary to my plans. All of the patterns were for doilies smaller than my chair-seat, but by using thicker yarn and a bigger hook, I hoped to get a larger result.


By the time I was working the final rounds of the doily, I knew it wouldn't be big enough. Some improvisation was needed. I left off the final round of decorative picots, and made a couple more rounds based on the previous pattern, joining the 'petals' of the doily to make a continuous round.


That was enough to extend the doily to the edges of the chair cushion. I used a netting-style stitch to stretch around and over the edges of the cushion, and that was that.


While the doily was drying out from blocking, pinned into shape over the (plastic bag-covered) chair cushion, I sanded down the chair and spray painted it grey. A piece of teal fabric and a staple gun covered the original hideous pattern on the chair seat, and a length of elastic, threaded through the edges of the doily, provided the means of holding it in place.


I'm quite pleased with my upcycled chair. It's actually the first thing I see when I walk in my front door, and I smile every time. It didn't use much of that yarn, though - there's still plenty left for the next project!


Sunday 23 August 2015

The yarn stash

It's a familiar phenomenon to any knitter or crocheter: that astonishing collection of leftovers, impulse buys and relics of projects either abandoned or yet to be started.


My own yarn stash, rapidly acquired in the year or so since I took up crochet, has taken ownership of a corner of my lounge, setting my natural hoarding impulse at war with a preference for uncluttered spaces. Even sorted tidily into bins, (which, in any case, tend to get scattered around the room when I'm looking for something) the collected yarn takes up a prominent position in the room.


You see, I've recently been handed my Nana's yarn as well - the accumulations of a lifetime's knitting and spinning, along with a huge array of knitting needles and sundry associated items. My comparatively modest collection was dwarfed by this influx of yarn, which includes many old-fashioned items I wouldn't have chosen myself, but hope now to find a use for.


The thing is, looking through your yarn stash with a project in mind is like contemplating your wardrobe when you've got a wedding to go to. Sure, there's plenty of stuff in there, but nothing that really suits the purpose. So what do you end up doing? You go out and buy something suitable (and add the leftovers to your stash when the project is finished).


I propose to do the opposite, i.e. come up with projects based on the yarn that I already have, instead of finding a pattern I like, then checking to see if I have any yarn that will work. It's the only way to shift the clutter in the corner.


Am I going to stop buying yarn? Don't be silly. There will still be things I want to make that necessitate further purchases, and if necessary I'm fine with adding new-bought yarn to a stash project, if it helps me use something up. This does of course mean that I'll still occasionally be adding to the stash, so I'll have to be careful to use up yarn faster than I'm adding it.


Inevitably, some of it will end up in granny squares. I had in fact begun a stash-busting granny square operation, prior to the arrival of the Nana stash. After all, it's the traditional use for odds and ends of yarn. However, I hope to come up with a few things that are a bit more inventive. After all, there's plenty of scope for creativity in crochet.


Actually, I don't intend to stick exclusively to crochet either. It's certainly my comfort zone, but I may just take this opportunity to expand my horizons a little. Perhaps it's time I took up knitting, or macramé - whatever uses the yarn!


Because after all, yarn is not for hoarding. It's for using.